DIY Guide on How I got my CANADIAN Student Permit Online - My Experience as a Filipina living in the Philippines
This article is a guest post by one of our readers, Amor Aquino.
Are you planning to migrate and study in Canada? If yes, then this post will certainly of help to you (HOPING) I hope you’re not thinking of handing your hard earn money to an agency to process this because I’m telling you right now that it’s a lot more easier than you think, and you could just set aside that money and add it to your proof of funds instead.
What I’m about to share are all based from my experience from the time of my application. It takes a lot of research so I suggest that you do not just read from here since Canadian Immigration policy can change from time to time. After reading here, get started on this LINK.
SO AMOR, then HOW? Let me break it down into 5 steps.
I. REQUIREMENTS GATHERING
School Application – Letter of Acceptance
Passport
Proof of Means of Financial Support
Letter of Intent (Jonathan can help you write your cover letter, details here.)
Digital Photo
NBI Clearance
II. APPLYING ONLINE
III. MEDICAL EXAM
IV. TRANSMISSION OF DOCUMENTS
V. DEPARTURE
I suggest you prepare a 6 month timeline for you to process all your requirements so you can have enough time just in case of any circumstances.
I. REQUIREMENTS GATHERING
For the online application I submitted, here are the following requirements I prepared with each one explained
Letter of Acceptance from your school choice
Before anything else, you should be able to decide to which part of Canada you want to study. For me there are 2 major factors you need to consider, one is that it has to be a step-up on the current field you have finished here in the Philippines and two is that its reasonable enough for you take the course outside of your current country. These factors are the key points you will have to discuss in your letter of intent to convince the visa officer to approve your application.
The school of your choice should also be from a designated learning institution found here. You should be able to navigate thru your school website with regards to the requirements needed for them to validate and provide you the letter of acceptance.
I have decided to apply in Camosun College in Victoria, BC with a course of Certificate in Business Administration. So why Camosun? Well its basically because of the convenience of navigating thru their website it’s very simple and informative. Once you email them, the amount of assistance is very helpful throughout the process.
SO WHAT DID I SUBMIT TO RECEIVE A LETTER OF ACCEPTANCE?
a. IELTS
As of my application they have informed me that they only accept applicants under SDS program which requires an Academic IELTS score of 6.0 with no individual band less than 6.0 to apply for academic programs at Camosun College. This was not indicated in their website so I assumed that my IELTS score that I took a year ago was enough. So I had to discuss this with their Enrollment Manager. Fortunately in the end they made an exception and accepted my application. Next step provided was to pay $15,000 CAD for them to issue my letter of acceptance.
I took my IELTS exam in IDP in Ortigas. For more details please navigate here IDP
b. Passport – see below for more details on Passport
c. High-school Transcript
d. College Transcript
e. Diploma
Passport
Below are the links for you to process your passport:
As this writing, appointments are to be paid within a certain time to be valid otherwise your appointment will be forfeited.
Proof of Means of Financial Support
For my proof of financial support and assurance of having enough money to fund my study within the span of my study I opened a bank account in RBC. Best part for opening an account in RBC is that you can do it online. Just go to their website and send your application. RBC will then contact you back to give you the requirements for you to open you bank account.
The requirements and steps I was asked of were the following:
Copies of 2 pieces of identification from List 1
A supporting document from List 2, if applying with foreign identification
The date you expect to arrive in Canada
Purpose to open an account in Canada
To open an account before you arrive in Canada, please follow the steps below:
1. Complete your account application
For a Sole Ownership Account (1 account owner), complete:
Application Form (# 116819), and
Specimen Signature Form (# 40830).
For a Joint Ownership Account (multiple account owners), complete:
Application Form (# 116819) for each account owner,
Specimen Signature Form (# 40830) for each account owner, and
Specimen Signature Form for Joint Deposit Accounts (# 40832). One Form signed by all the account owners.
2. Have your documentation certified (sign and stamp signature forms, copies of identification and agent forms)
You will need to visit a lawyer or notary who will verify your identification and documents. They must complete the RBC Agent Agreement in the application for each account owner.
Please visit one of the following:
a notary or lawyer listed on:
your Law Society listing
the www.martindale.com website
3. Send your application
Send a scanned copied of the requirements and once verified, the bank adviser will give you the address for you to send the actual documents thru mail.
Once they have received your documents, they will now open you the account and contact you thru mobile to give you the password of the encrypted email that contains your bank account details such as bank account number and the swift code. You will now then be able to wire-transfer the fund you need depending on how long your stay in Canada will be.
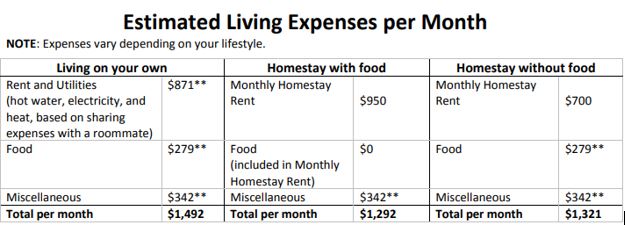
I transferred my fund from Metrobank to RBC. Camosun also provided me an estimated cost of living per month included on my LOA and my calculation of fund has been dependent on this. See below.
Once you have done the transfer, you will now be sent back with a bank statement of your current ending balance.
Now on to looking for a place to stay, luckily I know someone in Victoria, BC and she helped me arranged this. I paid 6 months advance thru wire-transfer and I was emailed with scanned contract for me to sign.
Next is to book a reservation flight without paying for the full price ticket! This is made possible by Two Monkeys Travel Group, THANKS 2MONKEYS! Once done your reservations are verifiable, for more details click HERE!

And that’s basically it! Do not be intimidated on how much proof you need to show, from my application my only proof of financial qualifications are below:
Proof of paid tuition to Camosun
Canadian Bank Statement with ending balance enough for my student permit validity according to the estimated monthly expenses given by Camosun
Proof of paid 6mos monthly rent
A booked Reservation Flight
My summary of proof of funds was not complicated, it was simple enough to show that I have enough to fund myself while studying.
Letter of Intent
My main template on creating my letter of intent was the one made by Shei in her blog. Click HERE for more details, she also has a lot of post that might help you.

Digital photo
Frame size
The final frame size of the photo must be at least 35mm x 45mm.
The photographs must show a full front view of the head and tops of shoulders, with the face in the middle of the photograph.
The size of the head, from chin to crown, must be between 31mm and 36mm.
Digital dimensions are often expressed in pixels or DPI (dots per inch). The physical dimensions in pixels must be at least 420 x 540.
Quality/resolution
If an existing photo is being scanned, the minimum resolution must be 600 pixels per inch.
File format
The file may be submitted in JPEG or JPEG2000 format.
The final size of the image should ideally be 240 kB (kilobytes), but not less than 60 kB.
The image must be in colour (24 bits per pixel) in RGB colour space, which is the common output for most digital cameras.
NBI Clearance
To process and claim your NBI Clearance sign up thru their website HERE

II. APPLYING ONLINE
Now your ready to upload those requirements online. First you have to create your account. Go to this LINK and create your GCKEY and ensure that you take note of your security question answer. Choose that you like to apply for student visa and check your eligibility. Once you are thru with that you will be provided with checklist such as below

You may upload your letter of intent in the optional documents below.

Once everything is uploaded you may go to the next steps and this is where you will have to pay for your application.

III. MEDICAL EXAM
Once you have uploaded everything, and the visa officer has received your files and no additional requirements is needed from you they will then send you back a message for you to undergo medical exam. I went thru medical exam via SLEC or St.Lukes. For more Details click HERE

I had a problem with my medical and I had to undergo further tests for this(I will discuss this soon on a separate post). In case yours went fine, SLEC will automatically send the medical exam result to the visa officer. From here you will just have to wait for the VO’s decision reply.
IV. TRANSMISSION OF DOCUMENTS
If nothing else is needed from your end, a corresponding letter will be sent to you thru your GCKEY account stating for you to send your passport to them.
HOW TO TRANSMIT YOUR PASSPORT?
Print your Original Passport Request letter and go to your nearest VAC. I had mine transmitted in VFS – Makati. Service Charge below

If possible just bring your documents and not bring a bag with you for you to getaway with a locker charge. VFS do not allow bags inside with the workstations and they charge 68.00 PHP for locker service.
Transmission usually takes 3 days before you can receive it back if you opt for them to mail you back your passport or you can just pick it up once you are noted that it’s available already.
V. DEPARTURE
Congrats! We have made it! Now book your flight and GOODLUCK!
Make sure you read the checklist HERE before arriving to Canada!

TIP! JOIN THE #StudyPermitCanadaDIY PH GROUP IN FACEBOOK! PEOPLE SHARE THEIR EXPERIENCE THERE AND YOU MIGHT FIND IT VERY HELPFUL AS WELL. IT SURELY HELPED ME
I hope above helped you in your application, if so please LIKE THIS POST and LET ME KNOW! Also don’t hesitate to comment if you have any questions. I’ll try my best to help out!

About the Writer: Amor Aquino
I worked for more than 4 years in the Philippines with my IT profession. Three years of these have been stagnant in a position where I experience working with different teams both in Manila and from different countries. I enjoy my work but I believe I can do more and due to business needs of the company I can't step-up to fulfil the career path I want. This is the point where I decided to go back and take a course related to business in Canada! I love traveling and experiencing different cultures so this this would be a new exciting journey in my life. Thanks to Mr and Mrs Howe of 2 Monkeys for being part of my visa processing! As of this writing I now have my student permit approved and ready to fly! Read her blog here.